从前端到后端整个流程如下:(后端使用的ssm框架) 页面HTML代码:
1. <div class="modal modal-hides" id="modal-default1"> <div class="modal-dialog"> <div class="modal-content"> <div class="modal-header"> <button type="button" class="close" data-dismiss="modal" aria-label="Close"> <span aria-hidden="true">×</span></button> <span class="modal-title">导出部门</span> </div> <div class="modal-body"> <div style="margin-left: 80px;margin-top: 20px;"> <p><span style="color: red;font-size: 20px;vertical-align: -5px;">*</span> <span style="font-size: 12px;">用户密码:</span> <input type="password" style="width: 210px;height: 30px;border-radius: 3px;border: 1px solid #ccc;font-size: 12px;" placeholder=" 请输入当前管理员用户密码" id="queryPsw"> <span id="PswRep" style="color: red;font-size:12px;"></span></p> </div> </div> <div class="modal-footer"> <button type="button" class="btn btn-default newaddbtn2" data-dismiss="modal">取消</button> <!-- <a th:href="@{/export/exprotDepartment}" id="downFile" style="display: none"></a>--> <button type="button" class="btn newaddbtn" id="export">确定</button> </div> </div> </div> </div> 运行结果: 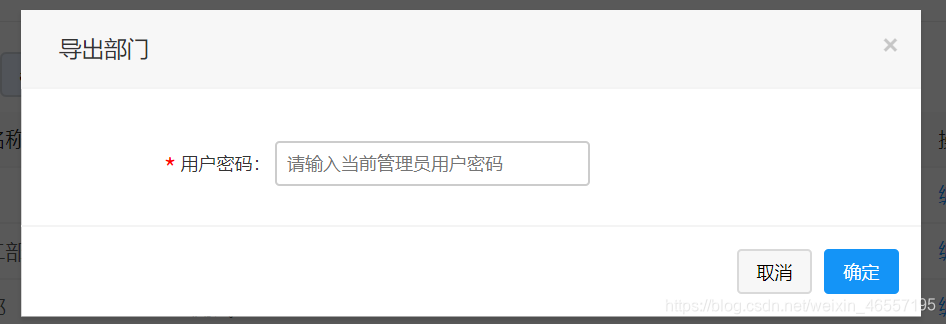当然有个前端用户密码验证过程: 前端js:
//导出清空数据 $('#_export').click(function(){ $('#queryPsw').val(""); $('#PswRep').text(""); }); $('#queryPsw').focus(function () { $('#PswRep').text(""); }); $('#export').click(function(){ $.ajax({ url:"../../export/checkPwd", type:"POST", data:{ password: $('#queryPsw').val(), }, success:function(data){ if(data.success){ window.open("../../export/exprotDepartment"); $('#modal-default1').modal('hide'); // $("#modal-success .modal-title").text(''); // $("#modal-success .modal-body").text('导出!'); // $("#modal-success").modal(); } else{ if (data.msg==""){ $("#modal-danger .modal-title").text('失败'); $("#modal-danger .modal-body").text('导出失败!'); $("#modal-danger").modal(); loadAJAX('#department'); }else { $("#PswRep").text(data.msg) } } }, error:function(){ } }) });主要核心代码在Controller层:
//密码验证 @RequestMapping( value = "/checkPwd", method = RequestMethod.POST) @ResponseBody public JSONObject checkPwd(@RequestParam(value = "password" ,required = false)String password, HttpServletResponse response, HttpSession session) throws IOException { JSONObject result = new JSONObject(); result.put("success", true); result.put("msg", ""); if (password==""){ result.put("success", false); result.put("msg", "密码不能为空"); }else { User current_u = (User) SecurityUtils.getSubject().getPrincipal(); User _user = userService.checkLogin(current_u.getUsername()); if (password.equals(_user.getPassword()) && result.getBoolean("success")){ result.put("success", true); }else { result.put("success", false); result.put("msg","密码错误"); } } return result; } 接下来就是导出的后端核心代码: controller层: //部门 @RequestMapping(value = "/exprotDepartment", method = RequestMethod.GET) public void exprotDepartment(HttpServletResponse response, HttpServletRequest request) throws IOException { Date t = new Date(); SimpleDateFormat formatter = new SimpleDateFormat("yyyyMMddHHmmss"); try { //创建临时csv文件 File tempFile = exportService.createTempFile_department(); String filename = "department-"+formatter.format(t)+".csv"; //输出csv流文件,提供给浏览器下载 outCsvStream(response, tempFile,filename); //删除临时文件 deleteFile(tempFile); } catch (IOException e) { System.out.println("导出失败"); } }service接口层:
//部门 @Override public File createTempFile_department() throws IOException { File tempFile = File.createTempFile("vehicle", ".csv"); CsvWriter csvWriter = new CsvWriter(tempFile.getCanonicalPath(), ',', Charset.forName("UTF-8")); // 写表头(字段需要与表格对应) //[在这里插入图片描述](https://img-blog.csdnimg.cn/20200703161717899.png) String[] headers = {"ID","部门名称","用户数","主机数","描述"}; csvWriter.writeRecord(headers); ArrayList<Department> datas = (ArrayList<Department>) departmentDao.selectAll(); for (Department data : datas) { csvWriter.write(data.getId().toString()); csvWriter.write(data.getName()); csvWriter.write(data.getCount().toString()); csvWriter.write(data.getDevice_count().toString()); csvWriter.write(data.getDescription()); /* csvWriter.write(data.getAccount());*/ csvWriter.endRecord(); } csvWriter.close(); return tempFile; }当然还有一些接口方法的添加,此处略~~ 如:service层添加: public List selectAll(); 完了吗,没有,还重要的一部(此处研究了很久) 还需要在Mapper.xml文件里面写上上面代码里面用到的selectAll()方法; 代码:
<select id="selectAll" resultType="com.longersec.blj.domain.Department"> select * from lsblj_department; </select>(第一个博客,发现挺难整啊!希望自己能坚持下去,加油💪) 以上就导出的整个基本流程,下期导入笔记上传 (研究当中) ~~嘻嘻ღ( ´・ᴗ・` )比心